# OpenLayers之点标记
看过之前的文章,对于OpenLayers会有一个大致的了解。下面我们继续讲解 OpenLayer如何创建点标记。
下面示例是以 OpenLayersV8.2.0版本 作为依赖包**。**
# 点标记
在地图上经常会打点上图,这是一个常见业务场景需求。像 打点标记,矢量边界线,点位提示窗等,也会经常需要,这些我们后面都会说道,现在来看看,OpenLayer中点标记如何上图。
OpenLayer中点标记(Marker)属于矢量图形,即矢量点。GIS地图上,日常开发上图的点、线、面、几何体都属于矢量图形。由于点标记的使用最为频繁常见,所以将它单独拿出来讲解。
OpenLayer中,点标记创建需要 Feature、Geometry、Style三者共同组合完成。Feature作为点标记的实体,Geometry创建几何体(点、线、圆、多边形),Style创建样式(颜色、粗细、文本等)。
当然,点标记创建完成后,需要添加到矢量图层,如果只创建不添加,就类似于只创建DOM节点,但是不append到是视图上。(点标记添加实际流程:需要先添加到矢量Source的要素上,Layer再使用矢量数据源)
下面我们来看看关于创建点标记的API和示例。
官方示例:Icon Point (opens new window)
# Feature
[ol.Feature](https://openlayers.org/en/v8.2.0/apidoc/module-ol_Feature-Feature.html):具有几何图形和其他属性特性的地理要素的矢量对象
// 创建要素对象
const Feature = new ol.Feature({
  // 创建geometry
  geometry: new ol.geom.Point([116.39, 39.91]),
  name: 'Marker'
})
2
3
4
5
6
Feature要素是地图上的可交互对象,可以是点、线、面等。要素需要添加到矢量图层中,才可展示。
# Geometry
Geometry与Feature是
ol/geom/Geometry:Abstract base class;
ol.geom.Circle:Circle geometry;ol.geom.LineString:Linestring geometry;ol.geom.LinearRing:Linear ring geometry. Only used as part of polygon; (无法单独使用);ol.geom.MultiLineString:Multi-linestring geometry;ol.geom.MultiPoint:Multi-point geometry.ol.geom.MultiPolygon:Multi-polygon geometryol.geom.Point:Point geometry;ol.geom.Polygon:Polygon geometry;
// 创建多边形 polygon
const points = [
  [
    [121.478815, 32.24161],
    [120.160318, 31.293255],
    [118.79129166, 32.06046152],
    [121.478815, 32.24161]
  ]
];
var feature = new ol.Feature({
  geometry: new ol.geom.Polygon(points)
});

// 创建 MultiLine
const points = [
  [
    [122.860194, 24.761729],
    [122.713016, 23.952719],
    [121.977124, 21.632922]
  ],
  [
    [125.509405, 24.896053],
    [125.509405, 24.896053],
    [124.11121, 21.632922]
  ]
];
var feature = new ol.Feature({
  geometry: new ol.geom.MultiLineString(points)
});
2
3
4
5
6
7
8
9
10
11
12
13
14
15
16
17
18
19
20
21
22
23
24
25
26
27
28
29
Geometry是用于创建几何体,创建Feature要素时,可以指定Geometry。
# Style
Style即可直接在要素(Feature)设置,也可以在矢量数据源(Source)上设置。
ol.style.Style:矢量要素渲染样式的容器;Fill:设置矢量要素的填充样式;Icon:设置矢量要素的icon样式;Text:设置矢量要素的文本样式;Circle:设置矢量要素的圆形样式;Stroke:设置矢量要素的描边样式;RegularShape:设置矢量要素的常规形状样式;
const iconStyle = new ol.style.Style({
    image: new ol.style.Icon({
        anchor: [0.5, 0.5],
        color: 'red',
        src: './img/point.png',
        width: 50
    })
})
2
3
4
5
6
7
8
官方示例:Icon Point (opens new window)、Marker Animation (opens new window)
# 示例
<!DOCTYPE html>
<html lang="en">

<head>
    <meta charset="UTF-8">
    <title>访问 Map</title>
    <link rel="stylesheet" href="./8.2.0/theme/ol.css">
    <script src="./8.2.0/en/latest/ol/dist/ol.js"></script>
    <!-- 不想下载就直接用下面的 -->
    <!-- <script src="https://cdn.jsdelivr.net/npm/ol@v8.2.0/dist/ol.js"></script>
		<link rel="stylesheet" href="https://cdn.jsdelivr.net/npm/ol@v8.2.0/ol.css"> -->
</head>

<body>
    <div id="map" style="height: 95vh; border: 6px solid;"></div>

    <script>
        const coordinate = [
            [
                116.38390602111816,
                39.91933196682435
            ],
            [
                116.40862525939941,
                39.89048282729144
            ]
        ]
        let map = new ol.Map({
            target: 'map',
            layers: [
                new ol.layer.Tile({
                    // source: new ol.source.OSM()
                    source: new ol.source.BingMaps({
                        key: 'Aud1dM5V1tT5Yvg2uX8Hp5ftaZZ4stEuJZ8i7IO1KSyLFj9A4UuamHK6_tUKEcGe',
                        imagerySet: 'Road'  // 指定加载的图层名,还可以替换为'AerialWithLabels' 'Aerial'或'Road'
                    })
                }),
            ],
            view: new ol.View({
                center: [116.39, 39.91],
                zoom: 13,
                projection: 'EPSG:4326'
            })
        });
        // 地图点击事件
        map.on('click', (e) => {
            console.log(e);
        })

        // 创建Style
        const iconStyle = new ol.style.Style({
            image: new ol.style.Icon({
                anchor: [0.5, 0.5],
                color: 'red',
                src: './img/point.png',
                width: 50
            }),
            text: new ol.style.Text({
                text: '点标记',
                offsetY: -35,
                fill: new ol.style.Fill({color: '#c6287b'})
            })
        })
        // 创建Feature要素
        const features = coordinate.map((item) => {
            const Feature = new ol.Feature({
                // 创建geometry
                geometry: new ol.geom.Point(item),
                name: 'Marker'
            })
          	// Style设置给Feature,也可直接放到Vector图层上
            Feature.setStyle(iconStyle);
            return Feature;
        })
        // 创建Vector图层
        const vectorLayer = new ol.layer.Vector({
            source: new ol.source.Vector(),
            // style: iconStyle
        })
      	// Feature要素添加到Vector图层
        features.forEach((item) => vectorLayer.getSource().addFeature(item))
      	// Vector图层添加到地图
        map.addLayer(vectorLayer);
      	// 点标注点击
        map.on('click', (evt) => {
            const Feature = map.forEachFeatureAtPixel(evt.pixel, (feature) => {
                return feature
            })
            if(Feature && Feature.get('name') === 'Marker') {
                console.log('Marker点标注');
            }
        })
    </script>
</body>
</html>
2
3
4
5
6
7
8
9
10
11
12
13
14
15
16
17
18
19
20
21
22
23
24
25
26
27
28
29
30
31
32
33
34
35
36
37
38
39
40
41
42
43
44
45
46
47
48
49
50
51
52
53
54
55
56
57
58
59
60
61
62
63
64
65
66
67
68
69
70
71
72
73
74
75
76
77
78
79
80
81
82
83
84
85
86
87
88
89
90
91
92
93
94
95
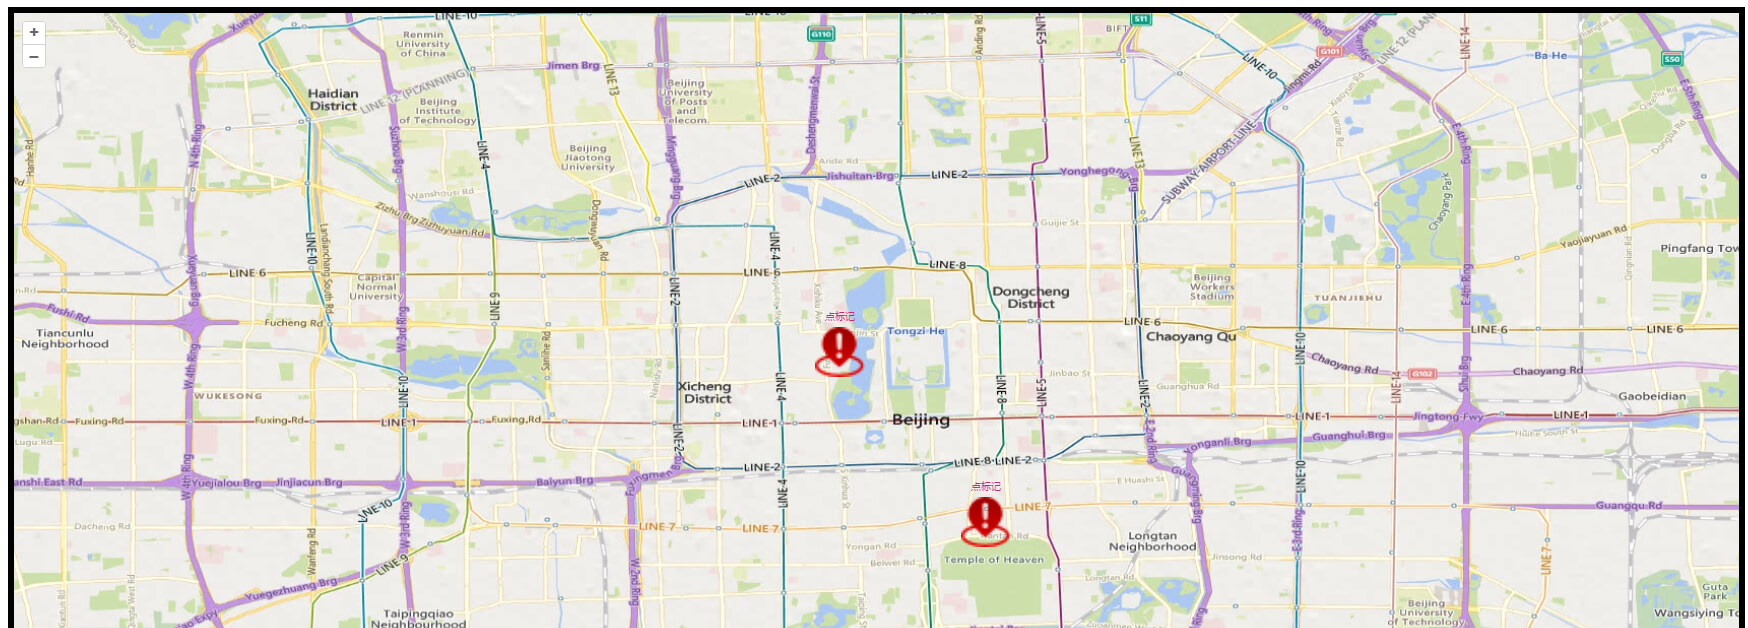
创建好Feature对象后,如果想上图,需要先将其添加到矢量Source上,Source和Layer是对应的,再将矢量Source添加到图层上,最好图层添加到地图上,要素(Feature)就可以展示啦!
下面我们来预览效果吧!
# 点聚合
看完点标记之后,我们矢量图形上图的基本模式了解了,下面我们一起来看看点聚合怎么搞!
# Cluster
首先我们想要点聚合,就不能不用矢量图层(Vector),因为点聚合也是失恋数据图形。既然是聚合,数据源(Source)当然要使用聚合。ol.source.Cluster会对给到的矢量数据进行聚合,我们只需要提供矢量数据。
const source = new ol.source.Vector();
for(let i = 0; i < 200;i++) {
  const coordinate = [116.39+Math.random(), 39.91+Math.random()];
  const Feature = new ol.Feature(new ol.geom.Point(coordinate));
  source.addFeature(Feature);
}

for(let i = 0; i < 200;i++) {
  const coordinate = [116.40+Math.random(), 39.92+Math.random()];
  const Feature = new ol.Feature(new ol.geom.Point(coordinate));
  source.addFeature(Feature);
}

// 聚合
const Cluster = new ol.source.Cluster({
  source: source,
  distance: 100
})
2
3
4
5
6
7
8
9
10
11
12
13
14
15
16
17
18
# Style
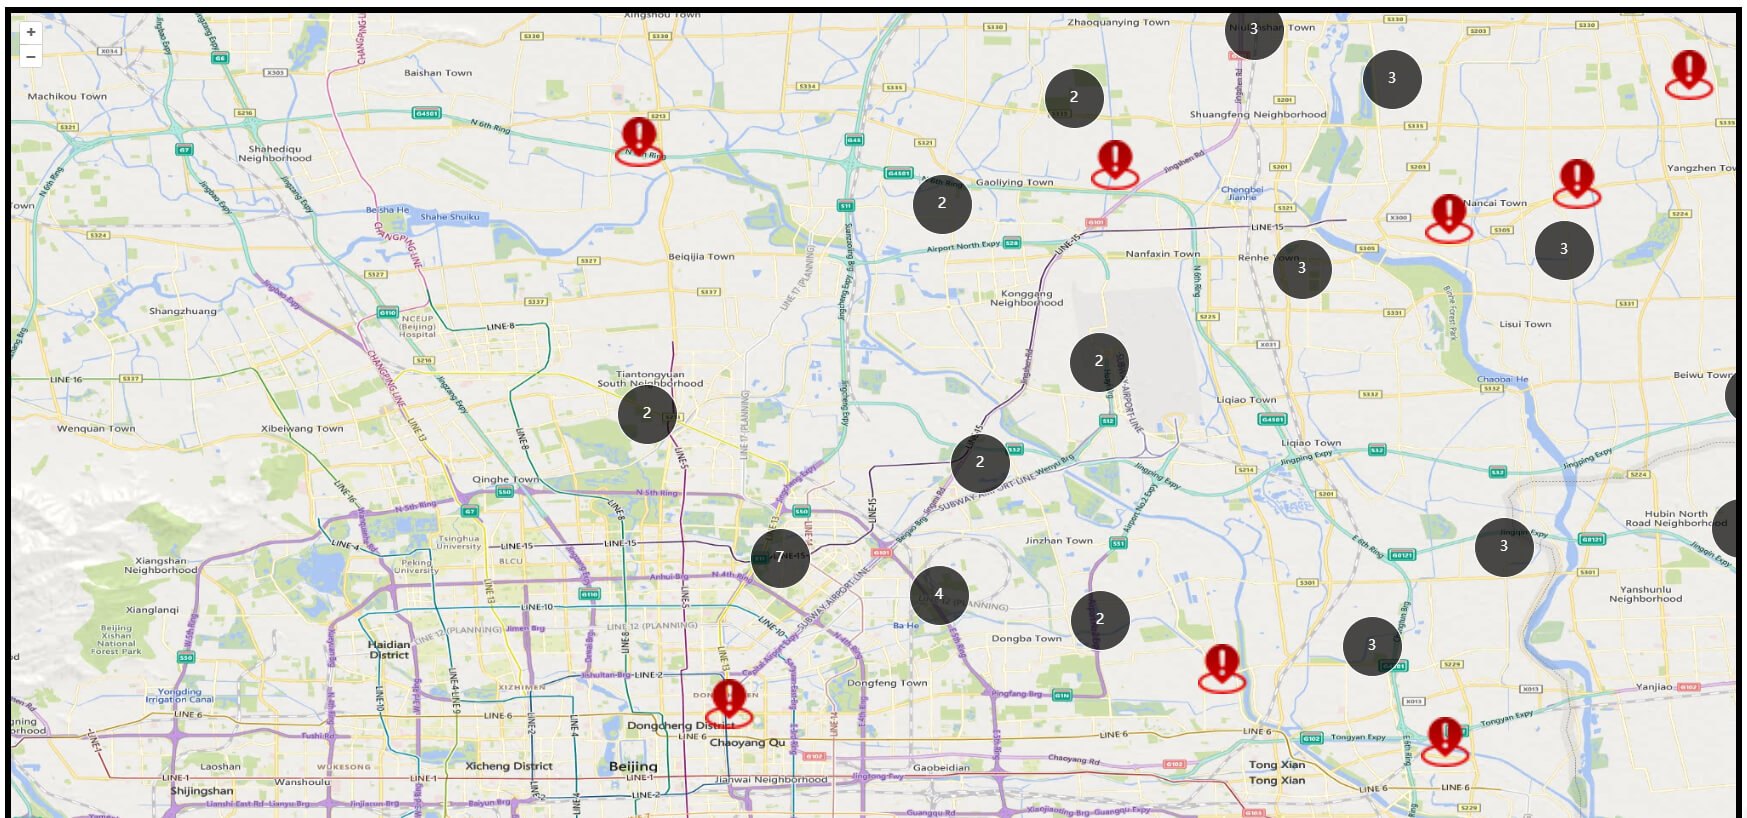
聚合数据源 + 要素 准备好之后,就只差要素的样式和上图了。下面来看看!
const Style = (options) => new ol.style.Style(options);
const Fill = (options) => new ol.style.Fill(options);
const Circle = (options) => new ol.style.Circle(options);
const Text = (options) => new ol.style.Text(options);
const Stroke = (options) => new ol.style.Stroke(options);
const Icon = (options) => new ol.style.Icon(options);
// 创建ClusterStyle
const createClusterStyle = (size) => {
    console.log(size);
    return Style({
        image: Circle({
            radius: 30,
            stroke: Stroke({
                color: '#fff'
            }),
            fill: Fill({
                color: 'rgba(0,0,0, 0.7)'
            })
        }),
        text: Text({
            color: '#fff',
            font: '14px sans-serif',
            text: size.toString(),
            fill: Fill({
                color: '#fff'
            })
        })
    })
}
// 创建MarkerStyle
const createMarkerStyle = (size) => {
    return Style({
        image: Icon({
            anchor: [0.5, 0.5],
            color: 'red',
            src: './img/point.png',
            width: 50
        })
    })
}
// 创建Vector图层
const vectorLayer = new ol.layer.Vector({
    source: Cluster,
    style: (feature) => {
        const len = feature.get('features').length;
        return len > 1 ? createClusterStyle(len) : createMarkerStyle(len);
    }
})
2
3
4
5
6
7
8
9
10
11
12
13
14
15
16
17
18
19
20
21
22
23
24
25
26
27
28
29
30
31
32
33
34
35
36
37
38
39
40
41
42
43
44
45
46
47
48
分别创建ClusterStyle 和 MarkerStyle,然后通过Vector图层的style函数进行判断,聚合主干的基本逻辑就完成了。
这里我们其实会发现,点聚合主要是数据源的聚合,配合ol.source.Cluster即可完成以上聚合的主要逻辑。
# 示例
<!DOCTYPE html>
<html lang="en">

<head>
    <meta charset="UTF-8">
    <title>点聚合 Map</title>
    <link rel="stylesheet" href="./8.2.0/theme/ol.css">
    <script src="./8.2.0/en/latest/ol/dist/ol.js"></script>
    <!-- <script src="https://cdn.jsdelivr.net/npm/ol@v8.2.0/dist/ol.js"></script>
    <link rel="stylesheet" href="https://cdn.jsdelivr.net/npm/ol@v8.2.0/ol.css"> -->
</head>

<body>
    <div id="map" style="height: 95vh; border: 6px solid;"></div>

    <script>
        let map = new ol.Map({
            target: 'map',
            layers: [
                new ol.layer.Tile({
                    // source: new ol.source.OSM()
                    source: new ol.source.BingMaps({
                        key: 'Aud1dM5V1tT5Yvg2uX8Hp5ftaZZ4stEuJZ8i7IO1KSyLFj9A4UuamHK6_tUKEcGe',
                        imagerySet: 'Road'  // 指定加载的图层名,还可以替换为'AerialWithLabels' 'Aerial'或'Road'
                    })
                }),
            ],
            view: new ol.View({
                center: [116.39, 39.91],
                zoom: 11,
                projection: 'EPSG:4326'
            })
        });
        // 地图点击事件
        map.on('click', (e) => {
            console.log(e);
        })

        // 矢量数据
        const source = new ol.source.Vector();
        for (let i = 0; i < 200; i++) {
            const coordinate = [116.39 + Math.random(), 39.91 + Math.random()];
            const Feature = new ol.Feature(new ol.geom.Point(coordinate));
            source.addFeature(Feature);
        }
        for (let i = 0; i < 200; i++) {
            const coordinate = [116.40 + Math.random(), 39.92 + Math.random()];
            const Feature = new ol.Feature(new ol.geom.Point(coordinate));
            source.addFeature(Feature);
        }
        // 聚合数据
        const Cluster = new ol.source.Cluster({
            source: source,
            distance: 100
        })

        const Style = (options) => new ol.style.Style(options);
        const Fill = (options) => new ol.style.Fill(options);
        const Circle = (options) => new ol.style.Circle(options);
        const Text = (options) => new ol.style.Text(options);
        const Stroke = (options) => new ol.style.Stroke(options);
        const Icon = (options) => new ol.style.Icon(options);
        // 创建聚合Style
        const createClusterStyle = (size) => {
            console.log(size);
            return Style({
                image: Circle({
                    radius: 30,
                    stroke: Stroke({
                        color: '#fff'
                    }),
                    fill: Fill({
                        color: 'rgba(0,0,0, 0.7)'
                    })
                }),
                text: Text({
                    color: '#fff',
                    font: '14px sans-serif',
                    text: size.toString(),
                    fill: Fill({
                        color: '#fff'
                    })
                })
            })
        }
        // 创建Marker Style
        const createMarkerStyle = (size) => {
            return Style({
                image: Icon({
                    anchor: [0.5, 0.5],
                    color: 'red',
                    src: './img/point.png',
                    width: 50
                })
            })
        }
        // 创建Vector图层
        const vectorLayer = new ol.layer.Vector({
            source: Cluster,
            style: (feature) => {
                const len = feature.get('features').length;
                return len > 1 ? createClusterStyle(len) : createMarkerStyle(len);
            }
        })
        map.addLayer(vectorLayer);
        // 点标注点击
        map.on('click', (evt) => {
            const Feature = map.forEachFeatureAtPixel(evt.pixel, (feature) => {
                return feature
            })
            if (Feature && Feature.get('name') === 'Marker') {
                console.log('Marker点标注');
            }
        })
    </script>
</body>

</html>
2
3
4
5
6
7
8
9
10
11
12
13
14
15
16
17
18
19
20
21
22
23
24
25
26
27
28
29
30
31
32
33
34
35
36
37
38
39
40
41
42
43
44
45
46
47
48
49
50
51
52
53
54
55
56
57
58
59
60
61
62
63
64
65
66
67
68
69
70
71
72
73
74
75
76
77
78
79
80
81
82
83
84
85
86
87
88
89
90
91
92
93
94
95
96
97
98
99
100
101
102
103
104
105
106
107
108
109
110
111
112
113
114
115
116
117
118
# 总结
Feature、Geometry、Style三者结合,实现矢量图形的上图;Geometry是feature对象的基本组成部分,存储一个要素的几何信息;Feature对象会被挂载到矢量数据源的要素上,再上图;Style是Feature的样式;- 点聚合实际是数据源的聚合;
武汉工作,会点Web,擅长Javascript.
技术或工作问题交流,可联系微信:1169170165.